20110918 A small group of posts from my other blog showing my wax modelling workstation. I set this up in my apartment in Thibodaux , LA while I was there for a construction project. The workstation is basically the same here in Oklahoma. I will leave the posts unedited.
20071227 original post 001
I brought back my wax bench table from the warehouse but quickly rediscovered why I placed the desktop on top of 2 steel wall brackets in my last studio. The wonderful Scandinavian cantilever design is great to look at but too weak for regular use. The table needs braces. The legs are spaced far enough apart to work in the center and reach each end without moving the chair and the legs are 8 inches from the outside edge. This space begs for pegboard or standards and 6 inch shelving there. I will opt for pegboard and still may add a shelf on each side. Materials: thin ply as stiffener with 1×2 fur strips, 1/4 inch pegboard and screws.
Think of every cavity or void as potential storage space. In a studio it is more efficient to have stuff nearby – where you need it.
The desk –

The components –

The result –

The contents –

A small vacuum is a great tool for the wax carving bench. The shavings go everywhere and wax is no fun to clean out of a carpet after the chair has rolled over it so clean as you go. I bought this vac after Xmas a few years ago at Home Depot for $9 clearance price. It has just enough power to pick up a wax shaving otherwise it would be useless.
More on the drawer contents next time on Art Night.
Mars out.
20071229 original post 002
What is in the wax workstation?

Wax What shapes do you need? I don’t know. What are you making? The small blue stick pieces on right are round, square, rectangular, bezel shapes. Green sheets range from 10 to 18 ga. Ring tubes, blocks, sprues and the miracle sticky wax. You must have sticky wax if you are going to sprue up your own trees.

The small back saws and miter boxes can be purchased at hobby stores that sell airplane kits and balsa wood. The mitres have a lip on the foot so it will grab the edge of a desk or table to help keep the box steady.
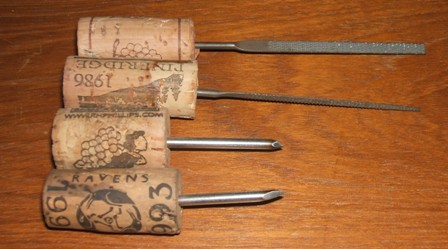
Wine corks are great for file handles and could probably be shaped a bit if you wanted to take the time. It is manipulated like a graver – cork part in a closed hand with the tool over the thumb. The cheapest tool I have is the nail through the wine cork. (I do not count the cost of the wine.) Sharpen the nail on a grinding wheel used for steel only. Keep wheels separated by what material they are used on.

Spiral blades, files dental picks, nail in cork, reamer, needle broaches, steel point, tweezers, x-acto, snap blades, surgical blade handles, bamboo, wire brush.
Always move a blade away from any part of your body.
Use three cuts where one will do.
All you need to carve wax is a point and a sharp edge. The Japanese use bamboo splinters/strips which are plentiful and cheap. I keep a small piece of bamboo but have plenty of steel tools.
I haven’t used all of these dental picks. Like hammers, files and stakes there are 2 or 3 I use 80 per cent of the time and the rest sit until what I normally use won’t work. Check with dental schools, dentists and dental labs.
The rifflers are only used on wax. I haven’t needed them in fabrication or clean-up after casting. In use it is hard to remove metal with them so I design my work to not need them. I do use them with wax regularly.
When working on a wax model there are only 4 or 5 tools on the bench at a time. Removing a lot of material requires rough work and the finishing stages need a fine touch – the tools are different so I have out what is needed for the task. Everything is right there in the drawer anyway. The #10 or 11 surgical blades are out all the time.
Needle broaches are great for drilling holes. You can make spade drills out of brad nails
The wire brush is to clean clogged files and burs.

Garage sales – small SS containers for small parts, old files, screwdrivers, knives, saws, saw frames
The yellow mini hack saw is from HD or Lowes and works well on ring tubes and blocks.
I use sculpey for wax pattern masters and various projects so the red handled files are used only on sculpey.
The heart is a cookie cutter I made from sheet copper for a series of one-off heart bolas and belt buckles.
Surgical blades can be ordered from some jewelry supply houses.
OptiVisor makes detail work easy.
The scale helps control mass as I’m making stuff. I have a good idea of the total charge of metal I want in a particular sized flask and how many wax pieces by weight and size will fit.

Here’s a typical think tank bonus. When I’m in the stores I look at clearance items and when something is a quarter I think “what can I use this for?” The tile blade was a no brainer: it is abrasive and will work on wax and soft metal; the ends will work in a jewelers saw frame; I can remove an end to have a round file/reamer. I bought a buck’s worth. Occasionally I set tile, too.
Mars out.
20071230 original post 003
A few more items for the wax workstation:

Small vise (I have a PanaVise which I couldn’t find on the last trip to the warehouse), alcohol burners, storage bottle for alcohol, book frame/easel to hold photos or books while cutting models, Japanese hobby knife set (these must be sharpened X-acto knives are a bit more convenient), flex shaft with #30 style hand piece for wax burs, and saw frames.

A shot of work in progress – necklace parts about 1/4 inch each.

A desk calendar (this one is new) is a great item to protect the desk as hot wax will drip here and there. The straight lines also provide reference lines for cutting through sheet wax – you can see through it.
Take your rouge, ZAM, Fabulustre or Tripoli stick and rub small section about 2 inches square in the upper right hand corner of the page. With the paper charged with compound from time to time I rub the tools on the paper to get a quick knife-edge polish while carving. Wax does not wear a steel edge quickly but you’ll notice the difference. A bit of leather glued to a board, sketch paper or cotton bond paper with a bit rougher texture works great, too.
Instead of the calendar pad a sheet of kraft or butcher paper works fine with a little tab of tape.

From the think tank are various PVC pipe tool holsters and stands. This one holds the larger files, wire brush and thin saw I use the most. I know the outside right row top to bottom is 1/2 round, round, 3 corner and flat, inside the yellow is a Swiss cut tapered flat #2, dark short handle is a reamer, saw on bottom. Place the holster where your hand will naturally fall and you don’t have to look.

Cut the pipe long enough to have options on mounting at an angle. To mount as holster make two holes for each screw – the outside hole is large enough for the driver bit to reach the screw and the inside hole is smaller than the head of the screw (of course it is) on the inside wall of the pipe.
I glue up one row at a time on a flat surface – gravity is my friend. Use the primer along the contact edge then swab glue on the same edge. Place the pipe sections next to each other and use two bricks on the outside to maintain a bit of pressure. This keeps the pipes in contact while the glue sets. If the next row is the same diameter then they nest just so. Primer and glue all contact surfaces. A fan and warm air will harden the glue quickly. I would let it dry over night.

If you use a smaller diameter pipe for second layer then they will leave a little space like my desk holster. After glue is set up you can spray paint it one color or leave it au natural.

If setting on bench top cut one edge of pipe block even with a hack saw for the bottom. This will take a little concentration. If you have access to a chop/miter saw use a fiber blade and cut. Dress the bottom with med/fine sand paper (full sheet glued to board) to smooth out if the footprint of your cluster is large enough to be stable. If not, then find a plastic container the approximate size of your pipe cluster. Place next to the container, mix up a little plaster and fill the bottom of the container with about 1/2 inch of plaster, set the pipe cluster in the plaster and jiggle a little to make sure it flows into the cells. Let it set, take out of plastic form and snap off excess plaster from outside the pipes. The mass of plaster inside each pipe should keep it stable. If not you’re on your own.
Mars out.
20070101 original post 004
Happy New Year and all that.
Okie dokie.
Work began on a new wax design today and it is proprietary so I won’t be showing step-by-step with it. I usually work on several designs at the same time so I will have a new one starting in a day or two. This would be a good time to explain that my production is not geared towards festival inventory per se. The minimum price point on my work will be the low three digits and up from there. It takes the same file and torch to make a $7 silver ring as it does to make a $300 brooch so brooches and more it will be. Since this production stage is wax there’s quit a bit left in the fabrication process and I’m looking locally for casting (jewelry store) before I haul the casting stuff down here. One step at a time…


The last couple of additions are lighting – $10 desk lamp from Mal-Wart and a magnifying lamp I found at the Goodwill in Albuquerque for $5 and the hanger stand I built for the flex shaft.

The hanger I put together with parts from Lowes for less than $10. The cheapest at the supply house is over $20 plus shipping. Parts: 1/2 inch flange, 36″ 1/2 inch galv pipe, 4 #12 screws and a 4″ paint roller cage. I wanted a chrome-y or decent looking hook for the motor and this was the ticket. Cut off the handle and roller, bend the last inch up to stop the motor from falling off and there it is.
On the desk the pill bottle has hard wax shavings I made with a fine cheese grater. I put a little pile on the calendar and can pick up what I need with a hot needle pick for building up small areas.
Mars out.
….
So, there they are – a few posts with thoughts about my wax modelling workstation.
Thanks for making it this far. Thoughts, comments, likes and feedback are all appreciated.
Marshall
